Showing posts with label pasta. Show all posts

Wednesday, September 7, 2011

Eggplant Parmigiana

We went to Yosemite National Park this summer and while there we ate at the Curry Village dining room at our campsite which has a buffet style restaurant.  I had never really tasted eggplant parmigiana before as it always looked sort of soggy to me. Since it was one of the only vegetarian entree options that night I decided to give it a try and it was very good! Last night was my second time trying it and I have to say, mine was much better;)
Italian Eggplant

I compiled a few recipes from Bobby Flay to Mario Batali to Martha Stewart but didn't really follow any of them.  If you want very specific instructions (not my strong suit!), google one of their recipes.  I did get some tips on a message board and someone posted this blog fxcuisine as it gives a tutorial on how to prepare the eggplant. A good read.
 
Sweating the eggplant slices
It is a very important step to sweat the eggplant slices with salt for 30 minutes to one hour before you fry them up to get all the excess water out. Don't skip this step.


Ingredients & Preparation: Serves 4
  • 1 large Italian eggplant
  • kosher salt
  • 1 cup flour
  • 2 eggs, whisked
  • oregano and parsley, to taste
  • 1 cup bread crumbs
  • 1/2 - 1 cup grated parmesan cheese
  • grapeseed oil, for frying (use enough to cover the bottom of your pan and then a little more)
  • 1 jar good quality pasta sauce
  • mozzarella cheese
  • spaghetti


Wash the eggplant and chop off the ends - no need to peel it. Slice the eggplant lengthwise (should yield about 8 slices).  Cover the front and back in kosher salt and leave in a colander to drain for 30 mins to one hour. Wash the salt off the eggplant and press dry with paper towels. Preheat the oven to 375F. Whisk the eggs up with your herbs. I used the prepare herbs that come in the squeeze tubes so it would blend well when whisked. I'm sure fresh herbs would work as well, just chop them up into fine pieces so they stick.  Add some paremsan to your breadcrumbs.  Next, dredge each slice in the flour, then the egg mixture and then the breadcrumbs.  Place carefully into your hot pan with the grapeseed oil. Keep it hot to fry but not enough to burn and smoke. Once they are brown on each side transfer to a baking dish lined with papertowels to soak up the excess oil. You will have to do this in batches. Remove the papertowel and eggplant slices and pour some of the sauce into the bottom. Next layer the eggplant (fan the slices out so it covers the dish) and in between each slice add some more parmesan cheese and tomato sauce. Top the entire thing with mozzarella cheese. Bake in the oven for 25 minutes and then broil the top for a couple minutes after that.   In the meantime, boil water and make some spaghetti noodles to serve with it.

Once the eggplant is baked, serve one or two slices with the steaming spaghetti, add some more tomato sauce and enjoy!

Sunday, July 24, 2011

Pasta Salad with Cherry Tomatoes, Feta and Zucchini Ribbons

A super summery cold pasta salad like this is perfect for a picnic lunch at the beach.  Easy to throw together in the morning before you head out it's a great little lunch that will satisfy big and small kids.  You can of course make your own variation based on what you have in the fridge. 

I used penne pasta (cooked according to the package and then rinsed under cold water) and tossed with crumbled feta, cherry tomatoes and zucchini ribbons. For the dressing, I used olive oil, some apple cider vinegar, salt & pepper.  Remember, depending on the size of your salad the amount of dressing you need to make will vary. For most vinaigrette dressings, try to keep your oil to vinegar ratio at 3:1. Be adventurous if you like and add in herbs, spices, onions, shallots, lemons or honey or try different types of vinegars (raspberry, balsamic etc.). Whisk to emulsify in a glass or ceramic bowl or shake in a mason jar to incorporate.

Making zucchini ribbons is very easy. Just wash the zucchini and cut off the ends. Next grab your vegetable peeler and start 'shaving' off thin lengthwise strips of zucchini stopping and turning when you see the seeds.


Friday, July 15, 2011

"Loaf Pan Lasagna" with Cottage Cheese & Spinach

The one thing that I don't like about making lasagna for our small family of 3 is that half of it goes to waste. I do love leftovers but somehow they always get pushed to the back of the fridge, forgotten about until cleaning day. And that doesn't end well.
I tried a new thing yesterday - making mini lasagnas in the meat loaf pan. I am not the first person to do this but for some reason it had never occurred to me before - it's magical! Half the cooking time and one pan equals one dinner for a small family. This recipe makes two loaf pan sized lasagnas so eat one tonight and freeze the other for a rainy day.

Now I know some people have a thing against cottage cheese so you can easily substitute ricotta in this recipe if you must...

Ingredients & Prep - Makes 2 loaf pans. Each serves approx. 2 adults & 2 kids with small appetites.  Recipe adapted from the meatier version on the blog Hogwash.

  • 2 cups 2% cottage cheese
  • 2 large eggs
  • dried basil
  • dried oregano
  • salt & pepper to taste
  • fresh minced garlic to taste
  • 3-4 cups marinara sauce
  • 2 cups frozen shredded spinach, thawed (I like to use frozen spinach because once you microwave it to thaw, you can easily squeeze the excess water out and it removes that pesky task of washing, chopping, stemming, cooking the fresh stuff).
  • 2 1/2 cups of mozzarella, shredded
  • 1 box no bake lasagna noodles.  Try to get the flat edge lasagna noodles that are smaller than traditional noodles. I like to use the Garofalo brand. They look like the noodles in the picture below. Perfect for a loaf sized pan.

1. Preheat oven to 350F.
2. Whisk the eggs to blend in a mixing bowl, and season with basil, oregano, garlic, salt and freshly ground pepper. Stir in cottage cheese, and set aside.
3. Thaw the spinach and squeeze out excess water.
4. Spread 1/4 cup of the marinara sauce on the bottom of each of two loaf pans. Add a sheet of pasta to each, followed by another 1/4 cup sauce, 2/3 cup of the spinach, and 1/4 cup shredded mozzarella. Next, add another sheet of pasta, followed by 1/2 cup of the cottage cheese mixture. (It will be slightly runny, that’s okay.) Top each with another noodle, then 1/4 cup sauce, and divide the remaining spinach between the two pans. Top each spinach layer with another 1/4 cup mozzarella, then a sheet of pasta, and divide the remaining cottage cheese mixture between the two pans. Finally, top the cottage cheese with the last of the pasta. Divide the remaining sauce over the noodles, spreading it to cover them all the way to the edges. Sprinkle each with about 1/2 cup mozzarella.
5. Cover each pan tightly with foil, and bake for 30 minutes. Remove foil, and bake another 15 minutes uncovered, until cheese is melted and beginning to brown. Remove from oven and let rest for 10 minutes before cutting and serving.
6. To freeze cooked lasagna, let cool to room temperature, then cover the top with foil, wrap in plastic, and freeze up to 2 months. Transfer to refrigerator 24 hours before baking, with foil on top, for 20 to 30 minutes at 350F, or until hot all the way through.


Wednesday, July 8, 2009

Seafood Cannelloni


I had a craving for seafood cannelloni today...but with no recipe and a cranky 8 week old baby to tend to I created this one as I went along. The turnout was quite good so I decided to get back into the swing of things and finally post a new better than takeout recipe!

The ingredients are simple and things have to be these days with a young one to manage and much less time than I had before...

Ingredients & Prep:

  • 1 box of oven ready cannelloni pasta (you may not use all of them)
  • 1 bag of small peeled and cooked shrimp (use 1/2)
  • 1 package of "crab" aka crab flavour pollock (use 1/2)
  • 1 can of flaked pacific salmon
  • 1/2 cup white wine
  • 1 1/2 jars Alfredo pasta sauce
  • 3 tbsps flour
  • 2 green onions diced
  • 1/2 fresh lemon (juice)
  • salt and pepper to taste
  • Parmesan cheese for topping
Put salmon, shrimp and "crab" in the food processor and pulse until bits are broken down (about 4 pulses) but still has a nice texture. Put mixture in a pot and warm through on the stove with half the Alfredo sauce. Add wine, flour, green onions,lemon juice and salt/pepper. Continue to warm for a few minutes. Taste test.

Prep your casserole dish for cannelloni. Fill each pasta shell with mixture (once cooled) and arrange in dish as per instructions for your specific pasta. Add the remaining pasta sauce on top and Parmesan for topping.

Bake as per instructions on your pasta box.

Serve with fresh bread and a green salad!

Friday, April 24, 2009

Swiss Chard & Creamy Pasta

I am posting this so I don't lose this recipe! I found it on the back of the tag on my organic Swiss chard. I got my first fruit and vegetable delivery of the season and it was in the delivery...very good. And really, who knows what to do with Swiss chard unless someone tells you???

Ingredients & Prep: (Recipe from the tag on my Organic Swiss Chard bunch)

1lb Swiss chard
1 tbsp olive oil
2 cloves garlic, minced
1/4 cup onion, diced
2 large tomatoes, chopped
1/2 cup of low fat sour cream
1/2 cup low fat milk
1/4 cup Parmesan
8 oz fettuccine, cooked
salt & pepper to taste

Wash the chard and cut into small pieces (compost or discard stalks). Heat oil in large sauce pan over m-h heat. Add chard, onion and garlic and cook 1-2 minutes. Stir occasionally. Add tomatoes, sour cream, milk, Parmesan cheese and cooked fettuccine. Stir together. Add salt & pepper. Serve warm.

I served my pasta with fish last night. It was meant to be halibut but the woman at the fish counter must have picked up the wrong fish because it was actually cod. Equally as delicious!

Swiss Chard on Foodista

Wednesday, November 26, 2008

My Best Veggie Lasagna Ever!


Now that I'm back in the kitchen I have been making some real comfort food. One of my favorites is vegetarian lasagna. Lately, we had been eating the boxed kind (yuck) because I hadn't been cooking but last night I whipped up a huge, fresh lasagna and it was divine! I threw this together in 1 hour. It is the perfect recipe if you are having anyone visit over the holiday season and need something that will suit everyone's taste and your budget.

Ingredients & Preparation: ("Recipe" is my own, but I just go by taste and experience)
Serves approx. 10 people

For the tomato sauce:

(you can use this one of this one if you prepare it ahead of time - http://betterthantakeout.blogspot.com/2008/08/basic-homemade-tomato-sauce.html)

  • 1/2 large yellow onion, diced
  • 1-2 cloves of garlic, minced
  • 1-2 tsps herbs of your choice
  • 1 large can of diced tomatoes
  • 1 small can of tomato paste
  • olive oil
Dice the onion. Saute in heavy bottom pot with olive oil until soft - about 5 minutes. Add garlic and cook 1 minute or so. Be careful not to burn garlic. Add the tomatoes and tomato paste. Stir until mixed through. Add herbs and stir. Let this heat on medium until you are ready to build your lasagna. Cook at least 15 minutes to incorporate flavours.

For the Lasagna:
  • 2 packages of fresh lasagna sheets, approx. 12 sheets that are 9 x 6 inches (or make your own)
  • 1 container of ricotta
  • 1 container of cottage cheese
  • 1 egg
  • approx. 2 cups fresh baby spinach, chopped
  • salt & pepper to taste
  • mozzarella or mixed cheeses, grated (approx. 340 grams)
The first thing you want to do is make the sauce. After you have done that, whiz your ricotta and cottage cheese up in a food processor until smooth. Add one egg and salt/pepper to taste. Whiz again to blend. Chop the spinach up. Grate your cheese. Pre-heat over to 350 degrees.

Now take a large rectangular pan and start to layer your lasagna. Add some of the sauce at the bottom to avoid sticking. Then add 2 sheets of pasta (if your pan is the same size as mine then the sheets should fit perfectly, 2 side by side). Top with ricotta mixture so it covers the pasta and then add some of the spinach. Next layer is tomato sauce and a little mozzarella cheese. Make sure to reserve quite a lot of the cheese for the top layer. Continue with the layering alternating between ricotta/spinach and tomato sauce/cheese. The final layer will be the remainder of the tomato sauce and the rest of the cheese. You should have 6 layers.

Cover with tin foil and bake for 30 minutes. After 30 mins. remove the foil and bake for another 5 minutes. Let sit for about 5 minutes - then cut and serve! Best with Italian or French bread and a green salad.

Note: You will see in my photo I used parchment paper in my pan to reduce clean up. Don't do this. Big mistake on my part! It didn't ruin the meal at all but scooping out the lasagna = scooping up some bits of paper too.

Thursday, September 11, 2008

Elk you say?

Well, me and the husb have not been eating meat for the past few months. I did promise way back if we ever found someone selling pastured, antibiotic/hormone free meat where we could meet and talk with the farmer and the animal was not killed in a commercial slaughter house we could buy some. Well, the husb's prayers were answered. He got himself some spicy elk sausage the other day at the Brickwork's Farmer's Market in Toronto. The animal is killed in a local, Mennonite abattoir and the meat is also processed/flavoured there as well...

Here is a snippet from the farm's website about what they do:


"At Glen Ewen Springs, we strive as a family owned farm to provide a safe and n
atural setting for our Red Deer & Canadian Elk to live. We pride ourselves on providing a naturally raised animal and using no hormones, steroids, pesticides, herbicides or growth enhancers. Our feeding program includes seasonal pasture, alfalfa forage, natural grains and minerals. Our venison products are also antibiotic free."


So, while I am not big on the idea of eating any meat at all the husb was happy to have some animal protein back in his life for at least that one day. No need for the recipe as it is a straight forward pasta. If you ever get your hands on some elk sausage try and be more creative than I was with this dish! I did add some amazing organic King oyster mushrooms, also from the Brickwork's Farmer's Market, which were divine.

Rudolph is a Reindeer, right? Just checking.


Tuesday, August 19, 2008

Buttered Linguine with Seared Scallops, White Wine, Chili & Parsely


Could there be anything better than a fresh, big, succulent sea scallop? I personally, don't think so. While they are quite expensive where I live, you can make do if you are on a budget by only buying a few and cutting them in half.

This recipe takes only a couple of minutes once you have all your ingredients ready to go. Get everything laid out before you start. You will want to eat this as soon as it is ready - I would have eaten it directly out of the pot if no one had been looking.

Thanks again to my food boyfriend Jamie Oliver for his brilliance.

Ingredients & Preparation: (from The Naked Chef by Jamie Oliver)
Serves 4
  • 12 scallops, trimmed (now I assume he means Bay scallops, but I used Sea scallops so you really don't need 12 if that's the type you are using or he is Jamie Oliver and can afford 12 big sea scallops)
  • 1 tbsp olive oil
  • 1 clove of garlic, peeled and finely chopped
  • 2 medium sized fresh red chilies, seeded and finely chopped
  • 3/4 cup of white wine
  • 1 lb of fresh pasta (Jamie suggests taglierini in the original recipe - I used linguine)
  • 1 good handful of flat-leaf parsley, roughly chopped
  • 1/4 cup of butter
  • salt & freshly ground black pepper

On a board, place each scallop on its flat side and slice it across in half. Put the olive oil in a hot pan and add the scallops, garlic and chili, which will sizzle and sear right away. As soon as the scallops have coloured on one side, pour in the wine, letting it reduce slightly.

Meanwhile, cook your pasta in boiling salted water until al dente. Add the pasta to the scallops with the parsley and butter and remove from the heat. Toss and taste for seasoning. Serve.

This is an excellent meal - you must try it!


Friday, August 15, 2008

Homemade Spinach & Ricotta Cannelloni


You can impress your friends with this one (I know you can, because I have done it). Fairly straight forward to make, this recipe is great for a weeknight or for a casual dinner with friends. Make extra for leftovers!
I have been making cannelloni for about 8 years now. It's one of my go to recipes or my "bread & butter" as my husband says. This is the first time I made it with home made pasta so it is extra special.

Ingredients & Preparation: (made up in my brain some 8 years ago)
Serves 4
  • 1 large tub of ricotta cheese
  • 2 cups of fresh and/or frozen spinach
  • 1 egg
  • salt & pepper to taste
  • homemade pasta sheets cut into 4-5" squares (or rectangles - whatever works!)
  • 1/2 cup of mozzarella, shredded
  • homemade bechamel and/or tomato sauce (see previous posts for instructions)

Whiz up your ricotta in a food processor with the egg and salt & pepper. Warm your spinach on the stove until wilty and soft. Set aside half of the spinach. Add the remainder to the ricotta and whiz until it is smooth.

Preheat oven to 350F. Get out a large oven-safe dish and add some sauce to the bottom (tomato would be best). Cut your pasta into 4-5" squares. If you don't have any homemade pasta buy the fresh lasagna sheets from the deli and cut each piece in half.


Place about 2 tbsp of the ricotta onto each piece of pasta and smooth it out so it is even. Leave some space at the edges. Add some of the reserved spinach. Now roll it up from one end to the other. Place seam side down in the dish. Continue until they are all rolled up. Now cover the pasta in your sauce of choice (I used both bechamel and tomato sauce in this recipe since I had just made them). Sprinkle the top with the mozzarella and place in the oven. Bake for about 20-25 minutes or until warm, gooey and golden brown.

Delicious with a side salad and big glass of vino!


Wednesday, August 13, 2008

Mushroom, Sage & Pinenut Ravioli served in a reduction of maple syrup, mushroom, olive oil & cream

I have to tell you - this was an experiment but it turn out better than I ever could have hoped! Along with my pasta maker I also bought a ravioli thingy (not sure the real name!). I can only hope that when I try to make this again it will be just as good!

Ingredients & Preparation:

Ravioli & Filling
  • 2 long sheets of fresh, homemade pasta (see last post)
  • 1/2 cup toasted pine nuts
  • 1 package of cremini mushrooms, sauteed (keep the juices for the sauce)
  • 2 slices of halloumi cheese, fried, cut into little pieces
  • 2 tbsp fresh sage, chopped
  • white pepper, to taste
  • 2 tbsp 100% real maple syrup
Saute the pine nuts and set aside. Saute the mushrooms, reserve juices and set the mushrooms aside. Fry up the halloumi. Mix up the pine nuts, mushrooms, halloumi, sage, pepper and maple syrup. Stir well.
Boil a large pot of salted water.
If using a ravioli maker, flour it well and place the first sheet of pasta over the mould. Push in the little holes. Add some of the mixture to each hole. Do not over fill. Place the next sheet of pasta over top. Using a rolling pin, roll over the edges (which are raised for this purpose) and cut the ravioli squares. Make sure there are no gaps. Carefully remove them.
Plop your ravioli into the water and bring back up to a soft boil (not a great rumbling boil). Cook for about 5-6 minutes. Taste one to make sure it is fully cooked.


While you are cooking the ravioli, make the sauce.
Ravioli Sauce
  • mushroom juices (previously set aside)
  • 2 tbsp extra virgin olive oil
  • 1/4 cup 18% cream
  • 1-2 tbsp chopped fresh sage
  • 2 tbsp 100% real maple syrup, or to taste (be careful not to make it too sweet)
Reduce the mushroom juices for about 1 minute or so. Add the cream and oil and whisk together. Cook another 1-2 minutes. Add sage and maple syrup. Stir well. Remove from the heat and add to the pasta straight away. Coat the pasta evenly. Garnish with some sage and halloumi bits.

Enjoy!

Homemade Pasta: an everyday quick recipe

You might have wondered why I was posting about basic sauces earlier this week (or not, but I'll pretend you care). Along with my French butter chiller that I bought on the weekend, I also bought myself a manual pasta maker! I've wanted one for a while now and just haven't felt like spending the money on one. I found mine for $19 at Cayne's Housewares. This way if I don't like making my own pasta it won't be a waste of money. Needless to say, every meal this week has been pasta based!

This is a basic pasta recipe and can also be made if you don't have a pasta maker.

Ingredients & Preparation: (from The Naked Chef, Jamie Oliver)
Serves 4

  • 1lb of bread flour (3 1/2 - 4 cups)
  • 5 fresh, large eggs (preferably free-range organic)
  • semolina flour for dusting
You can use either a food processor or an electric mixer for the first stage. I used my KA Mixer with the dough hook attachment so that is the process I am posting here.
Add the flour to the eggs and mix at a medium speed for 3 minutes or until a firm dough forms. Take the dough out of the mixer and finish kneading by hand or until the dough is smooth, silky and elastic. If the dough is sticky, add some more flour. If it is too crumbly, add some more egg. Don't ever add water or oil.
Form the dough into a ball. Wrap in plastic wrap and put it in the fridge for 1 hour.

Once your pasta has chilled in the fridge, remove it and cut it into 4 balls. Work with one at a time and keep the others covered. Flatten the dough with the palm of your hand and run the dough through the thickest setting on your machine. Do this 3-4 times. Change your setting to a thinner one and run the pasta through another few times. Make sure to use flour to stop any stickage. Yes, I know stickage is not a real word. ;) Roll the pasta through until it is 1-1.5mm thick.
Follow instructions above for the rest of the pasta until you have a bunch of fresh pasta. Depending on the pasta maker you have, you can make your pasta into all sorts of different noodle shapes. If it doesn't have a certain attachment, you can always cut your pasta by hand. Hang it to dry and then seal it in airtight containers if you want it for another time or use it right away.
I'll be posting 3 new pasta recipes so you can always attempt one of those!

Sunday, August 3, 2008

Orzo with Grilled Shrimp, Summer Vegetables & Pesto Vinaigrette


I've never cooked orzo before but it is a great pasta shape! Looks like rice but isn't - it's a tricky little noodle. The fresh, seasonal flavours of this dish are amazing after about 1 day when they've had a chance to really get incorporated with everything. This pasta salad can be served cold or at room temperature. Another great option for a potluck, picnic or a summer evening on the porch.
Ingredients & Preparation: (Original recipe from epicurious, Bon Appetit June 2008)
Serves 6

  • 8 ounces orzo (about 1 1/3 cups)
  • 6 1/2 tablespoons extra-virgin olive oil, divided
  • 4 tablespoons red wine vinegar, divided
  • 2 medium zucchini or summer squash (about 9 ounces total), cut lengthwise into 1/4-inch-thick slices
  • 1 red or yellow bell pepper, quartered
  • 3 tablespoons purchased pesto
  • 2 tablespoons fresh lime juice
  • 1 pound uncooked large shrimp, peeled, deveined
  • 2 heirloom tomatoes (8 to 10 ounces total), cored, cut into 1/2-inch cubes (about 2 cups)
  • 1/2 cup thinly sliced fresh basil leaves plus sprigs for garnish
  • 1 8-ounce ball fresh mozzarella cheese, cut into 1/2-inch cubes (I did not add mozzarella because we were having mozzarella sandwiches as well)

Cook orzo in large pot of boiling salted water until tender but still firm to bite, stirring occasionally. Drain. Rinse with cold water; drain well. Transfer to large bowl and toss with 1 tablespoon oil.

Prepare barbecue (medium-high heat). Whisk 2 tablespoons oil and 2 tablespoons vinegar in small bowl. Brush zucchini and bell pepper with oil mixture, then sprinkle with salt and pepper.

Whisk pesto, lime juice, remaining 3 1/2 tablespoons oil, and remaining 2 tablespoons vinegar in small bowl for pesto vinaigrette. Place shrimp in medium bowl. Add 2 tablespoons pesto vinaigrette; toss to coat.

Grill zucchini and bell pepper until crisp tender, about 3 minutes per side for zucchini and 4 minutes per side for bell pepper. Transfer to work surface. (I baked my zucchini, shrimp & peppers in the oven and that worked well - about 10 minutes at 350F.)

Sprinkle shrimp with salt and pepper; grill until charred and cooked through, 2 to 3 minutes per side. Place shrimp in bowl with orzo. Chop zucchini and bell pepper; add to bowl with orzo. Add remaining vinaigrette, tomatoes, sliced basil, and mozzarella; toss to combine. Season to taste with salt and pepper.

DO AHEAD: Can be made 2 hours ahead. Cover; chill. (I made mine the night before and I think that it turned out just fine!)

Garnish with basil sprigs and serve cold or at room temperature.

Friday, July 25, 2008

Couscous with peppers, onions, pine nuts & thyme

This will just be a quick post.

If you are looking for an easy meal to make on a work night, give this a try. Satisfying, super easy, only 1 pan required and quick. Make extra couscous for lunch the next day. This is also a great option for a picnic!

Ingredients & Preparation:
Serves 4

  • 1 cup of Israeli couscous
  • 4 cups of vegetable stock
  • 1 chopped red pepper
  • 1 chopped onion or 2 chopped shallots
  • 1/2 cup of toasted pine nuts
  • 5 sprigs of thyme, leaves only (fresh from my garden!)
  • some olive oil
Add some olive oil to a heavy bottom, deep frying pan. Add pine nuts and saute until golden. Set aside. Add onions and cook until soft. Set aside with the pine nuts. Add 4 cups of vegetable stock to the same pan, bring to a boil. Add the couscous and bring back to the boil. Cook for 8 minutes or until al dente. Strain. Put couscous, onions, and pine nuts back into the pan. Toss in the red peppers (I don't cook these - I like them crunchy!) and thyme leaves. Stir until mixed through. I didn't need to add any extra salt or pepper. Garnish with thyme. I served mine with falafel (buy a store bought mix and make at home) but the couscous can be enjoyed alone.

Thursday, July 17, 2008

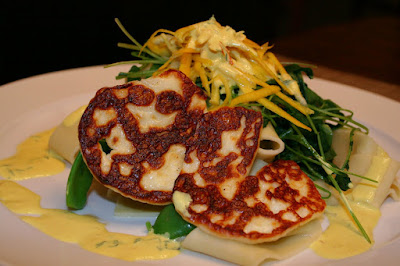
Snap Pea & Yellow Zucchini Parpadelle with Saffron Thyme Cream


Hands down this is the best pasta I have ever dreamed up on the way home from work. Do you ever get into a funk where nothing you make seems to taste that good? I get that sometimes, other people may like it (or are they just saying that?) but this dish I absolutely loved! You must give it a try. Sometimes the best creations are a complete fluke. It's quite late and I should be in bed but I had to write this all down before I forgot what I did!
I wanted to use up some sugar snap peas and zucchini I had in the fridge. These ingredients are key to the dish so make sure you use the freshest produce you can...
Ingredients & Preparation:
Serves about 3 as a main course
For the cream sauce you will need -
  • 1 cup 18% cream
  • few pinches of saffron
  • about 6 springs of fresh thyme (pull the leaves off)
  • 1 clove of garlic, minced
  • a few shakes of white pepper
  • a pinch of sea salt (I used Salish Smoked Salt from the Pike Place Market)
  • a generous swirl of good quality, fruity olive oil

For the pasta -

  • 1 package of fresh lasagna sheets, cut into strips to make a "cheat's parpadelle" noodle
  • 2 handfuls of sugar snap peas, topped & tailed
  • 1 handful of watercress leaves (cut off the long stems as they are hard to swallow in pasta - I learned the hard way)
  • 1 small yellow zucchini, grate on a cheese grater to make little strips
  • 4-6 slices of halloumi cheese, 1/4 inch slices (this cheese is fairly salty so go easy on the salt in the cream sauce)

Bring a large pot of salted water to the boil in preparation for your pasta.

In a small pan, add the ingredients in the order listed above. Using a small whisk, gently stir the sauce to incorporate all the ingredients. Use a medium heat so it doesn't burn. Slowly whisk the sauce until it becomes a little thicker (the cream may become too thick if you beat it too much) and heat through. You don't want a runny consistency but you also don't want whip cream! Set aside when ready.

Add your pasta and bring to a boil. Fresh pasta shouldn't take too long to cook.

In another pan, add a smidgen of water, cover and steam your snap peas and watercress for only a few minutes until they are warmed through but still crunchy. You don't need to cook the zucchini.

In a small non-stick frying pan, add a touch of olive oil and place your cheese in for about 3 minutes per side or until golden brown.

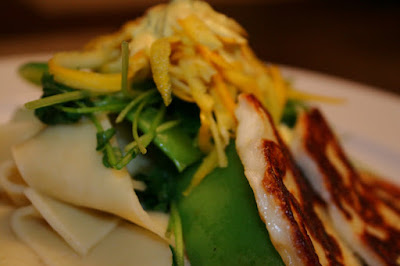
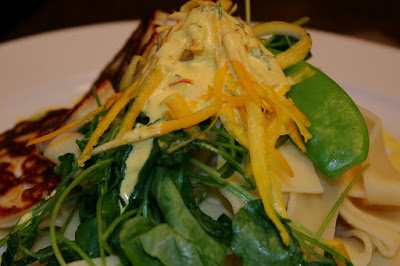
Plate the pasta first in the centre and build the dish up from there. Add the snap peas and watercress. Then the zucchini on top. Place the cheese slices (about 2 per dish) on the side and give the plate a generous drizzle of the saffron thyme cream.

Enjoy this meal on a warm summer night with friends!

Monday, July 7, 2008

Pad Thai with Tofu

Super tired today. But, I still managed to get myself to the grocery store to buy some food for dinner. I wanted to do something quick and easy. Pad Thai with Tofu seemed to be the answer! I'm off meat for now and probably forever (more on that later - requires a separate post) so I cooked with tofu for the 2nd time in my life tonight. I've eaten it many times but never prepared it myself. Dinner was delish.

Ingredients & Preparation:
Serves 2-3.
  • 1 egg, scrambled
  • 1/2 "brick" of firm tofu, diced into little pieces
  • 2 tbsps canola oil
  • 1/2 package of broad rice noodles
  • 1 package of pad Thai sauce, store-bought (A Taste of Thai brand is good)
  • fresh cilantro, roughly chopped
  • green onion, diced
  • handful of peanuts, chopped
  • 1 lime, cut into quarters or smaller for garnish
  • bean sprouts, optional

Cook your tofu in the oil for a few minutes until hot (add salt if you like). Set aside. Scramble your egg and set aside with tofu. Cook your noodles according to package directions. Heat the sauce. Mix the noodles with the sauce in a large serving bowl. Add the tofu and egg. Top with cilantro, green onion, peanuts and garnish with lime. Bean sprouts are good if you have them. I had them tonight but forgot to add them until it was time to eat.

Feel free to add some grilled shrimp or chicken to this dish instead of the tofu.

This is much better than takeout!

Wednesday, May 21, 2008

Roasted Butternut Squash, Rosemary, and Garlic Lasagna


This is SUCH a decadent meal for a Wednesday night but it was the American Idol finale so that's something to celebrate, right? I was supposed to make this on the weekend but never got around to it. Not the most healthy option in the world, but the flavour and melt in your mouth goodness really are worth a *few* extra calories. At first, you may think that butternut squash, rosemary & garlic don't work together but once it is all warm, bubbly and melted together it is delicious!

I am trying to find out if it is Lasagna or Lasagne. Both options seem to be acceptable. Please feel free to post a comment and let me know which is correct!

Ingredients & Preparation: (From Epicurious, original from Gourmet, December 1995)
Servings: Makes 6 main-course or 12 side-dish servings.
  • 3 pounds butternut squash, quartered, seeded, peeled, and cut into 1/2-inch dice (about 9 1/2 cups)
  • 3 tablespoons vegetable oil
  • 4 cups milk (I used skim)
  • 2 tablespoons dried rosemary, crumbled
  • 1 tablespoon minced garlic
  • 1/2 stick (1/4 cup) unsalted butter
  • 4 tablespoons all-purpose flour
  • nine 7- by 3 1/2-inch sheets dry no-boil lasagne pasta
  • 1 1/3 cups freshly grated Parmesan (about 5 ounces)
  • 1 cup heavy cream (35%)
  • 1/2 teaspoon salt
Garnish: fresh rosemary sprigs

Preheat oven to 450°F. and oil 2 large shallow baking pans.

In a large bowl toss squash with oil until coated well and spread in one layer in pans. Roast squash in oven 10 minutes and season with salt. Stir squash and roast 10 to 15 minutes more, or until tender and beginning to turn golden.

While squash is roasting, in a saucepan bring milk to a simmer with rosemary. Heat milk mixture over low heat 10 minutes and pour through a sieve into a large pitcher or measuring cup.

In a large heavy saucepan cook garlic in butter over moderately low heat, stirring, until softened. Stir in flour and cook roux, stirring, 3 minutes. Remove pan from heat and whisk in milk mixture in a stream until smooth. Return pan to heat and simmer sauce, whisking occasionally, about 10 minutes, or until thick. Stir in squash and salt and pepper to taste. Sauce may be made 3 days ahead and chilled, its surface covered with plastic wrap.

Reduce temperature to 375°F [I missed this step (duh!) and baked at the high heat! No wonder the fire alarm went off. It didn't burn however, so no worries] and butter a baking dish, 13 by 9 by 2 inches.

Pour 1 cup sauce into baking dish (sauce will not cover bottom completely) and cover with 3 lasagne sheets, making sure they do not touch each other. Spread half of remaining sauce over pasta and sprinkle with 1/2 cup Parmesan. Make 1 more layer in same manner, beginning and ending with pasta.

In a bowl with an electric mixer beat cream with salt until it holds soft peaks and spread evenly over top pasta layer, making sure pasta is completely covered. Sprinkle remaining 1/3 cup Parmesan over cream. Cover dish tightly with foil, tenting slightly to prevent foil from touching top layer, and bake in middle of oven 30 minutes. Remove foil and bake lasagne 10 minutes more, or until top is bubbling and golden. Let lasagne stand 5 minutes.

Garnish each serving with rosemary.

Sunday, May 11, 2008

Toasted Israeli couscous with pine nuts & parsley

This is a very simple dish to make. I love Israeli couscous. Due to the size of the pieces (much bigger than "normal" couscous), the flavour from the broth is captured much better. The toasted pine nuts really added a great layer. The cinnamon added only a slight scent and was not overpowering at all.

I will definitely make this again.

Ingredients & Preparation (Recipe from Epicurious, Original from Bon Appétit, December 2004)

  • 5 tablespoons butter, divided
  • 2/3 cup pine nuts (about 3 1/2 ounces)
  • 2/3 cup finely chopped shallots
  • 3 cups (16 ounces) Israeli toasted couscous
  • 1 large cinnamon stick
  • 2 fresh or dried bay leaves
  • 3 3/4 cups canned low-salt chicken broth
  • 1 teaspoon salt
  • 1/2 cup minced fresh Italian parsley

Melt 1 tablespoon butter in heavy large saucepan over medium-low heat. Add pine nuts and stir until golden brown, about 8 minutes. Transfer to small bowl.

Melt remaining 4 tablespoons butter in same pan over medium heat. Add shallots and sauté until golden, about 10 minutes. Add couscous, cinnamon stick, and 2 bay leaves and stir until couscous browns slightly, stirring often, about 5 minutes. Add broth and salt and bring to boil. Reduce heat to low; cover and simmer until couscous is tender and liquid is absorbed, about 10 minutes. Stir in parsley and pine nuts. Season with black pepper. Transfer to serving dish.